Building Text Detection: Inside Kiri OCR's DB Implementation
When building Kiri OCR, we faced a huge challenge: getting the computer to "see" where the text is on a page. It sounds simple—just draw a box around the words—but real-world documents are messy. ID cards, invoices, and handwritten notes are full of complex layouts, rotated text, and mixed languages.
We needed a system that could accurately pinpoint text before trying to read it. This is the story of how we built our text detector using a method called DB (Differentiable Binarization) and made it production-ready.
The Challenge: Why Finding Text is Hard
You might think finding text is easy, but for a computer, it's surprisingly difficult:
- Complex Layouts: Documents have columns, tables, and headers scattered everywhere.
- Messy Scans: Papers are often scanned at an angle or crumpled.
- Touching Letters: In handwriting or tight fonts, letters often touch each other, making them hard to separate.
- Reading Order: It's not enough to just find the boxes; you have to know which one comes first (like reading the left column before the right one).
Most standard tools work fine for simple English documents but fail when things get complicated—especially with mixed Khmer and English text, which is crucial for our work in Cambodia.
Why We Chose the "DB" Algorithm
We tested several popular methods, but many had flaws: some were too slow, while others couldn't handle rotated text or complex shapes.
We settled on DB (Differentiable Binarization) because it offers the best balance:
- Handles Rotation: It can find text even if it's upside down or sideways.
- Versatile: It works equally well on printed documents and handwriting.
- Fast: It runs quickly on standard computers, not just supercomputers.
- Adaptable: We could teach it to understand Khmer specific features.
How It Works: The Pipeline
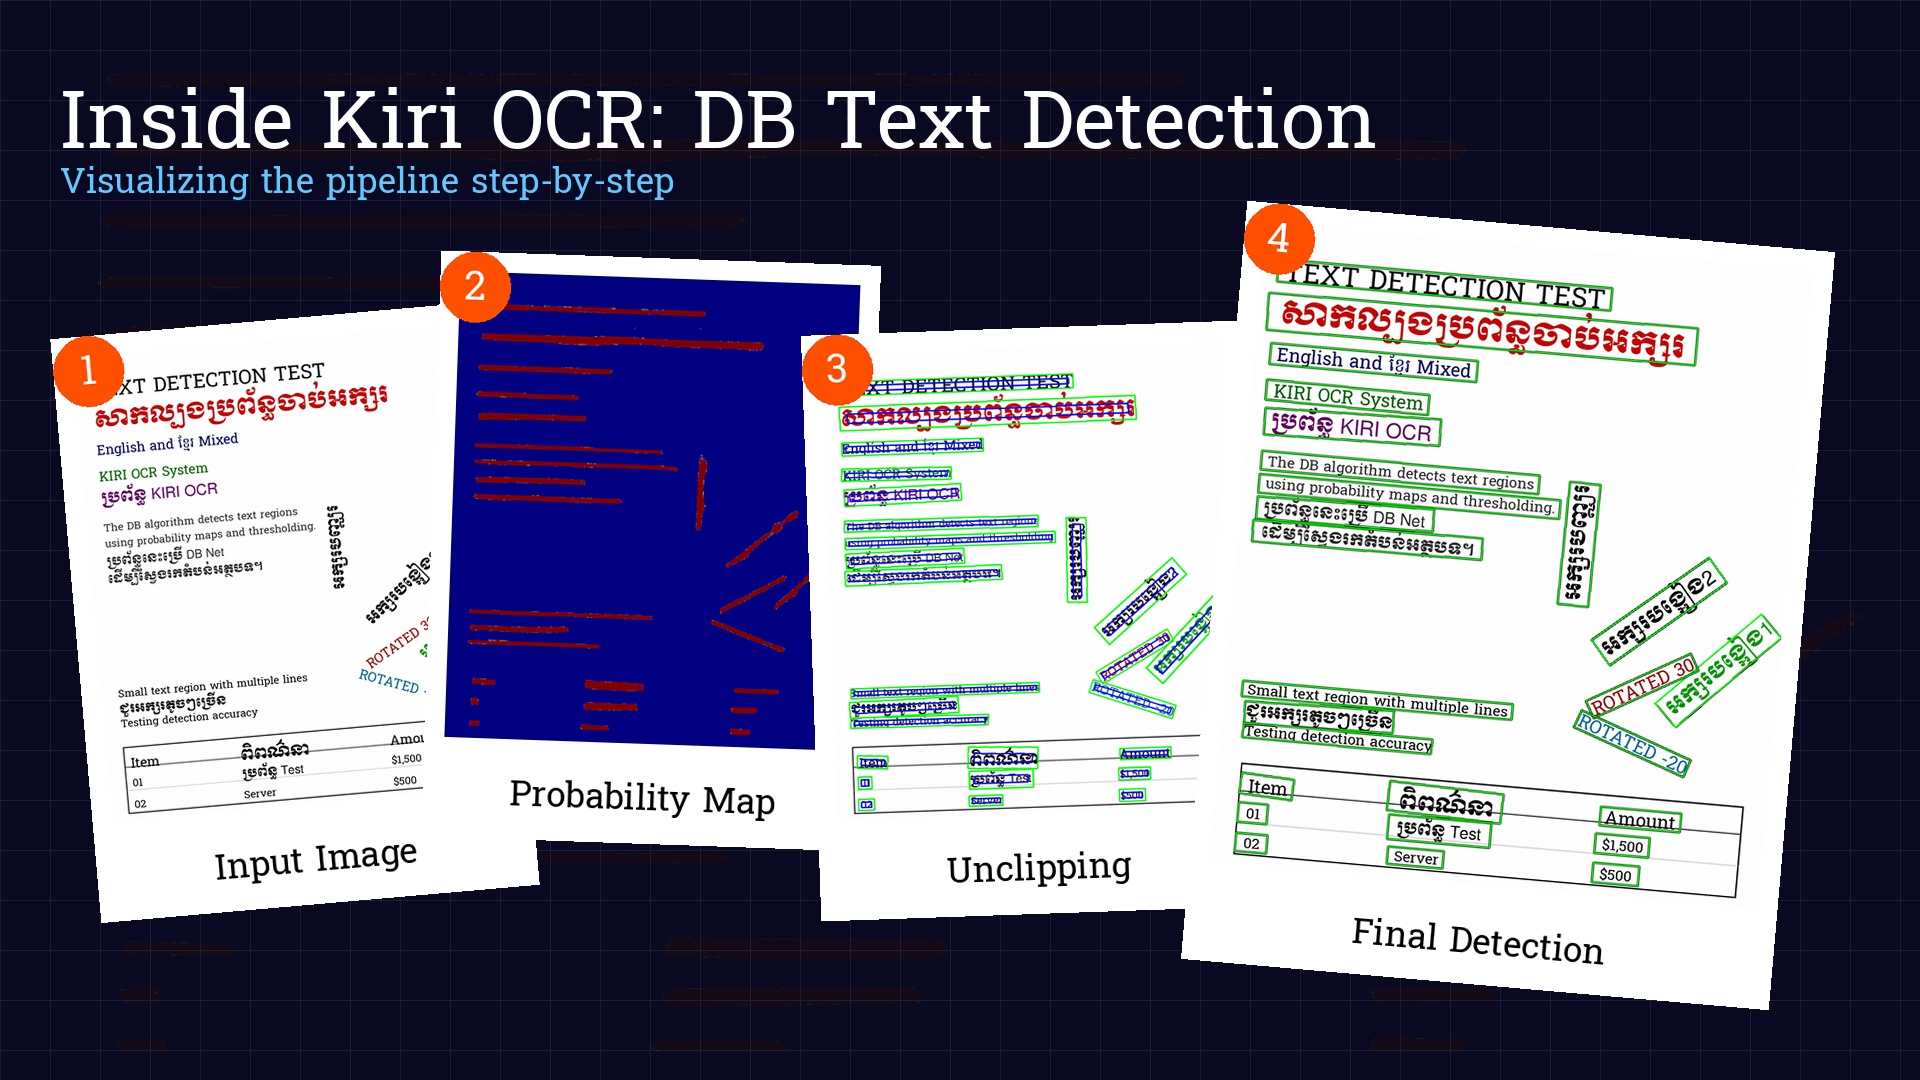
Think of our system like a factory assembly line. Here is the simplified process:
- Preparation: We take the image and resize it so the AI can process it efficiently.
- The "Heatmap": The AI scans the image and creates a "probability map" (or heatmap). It highlights everything it thinks is text.
- Cleanup: We convert that heatmap into clean shapes (boxes).
- Refinement: We expand the boxes slightly to make sure we didn't cut off any edges of the letters.
A Look Under the Hood
1. Smart Resizing
First, we resize the image. Computers prefer numbers divisible by 32, so we carefully adjust the size without squashing or stretching the text.
2. From Heatmap to Boxes
The AI output looks like a glowing heatmap. Brighter areas mean the AI is more confident that it's text. We turn this glow into solid shapes.
# Binarization thresholdbitmap = (pred > self.det_db_thresh).astype(np.float32)# Find contourscontours, _ = cv2.findContours((bitmap * 255).astype(np.uint8),cv2.RETR_LIST,cv2.CHAIN_APPROX_SIMPLE)for contour in contours[:self.max_candidates]:# Get minimum bounding boxbox, sside = self._get_mini_boxes(contour)if sside < self.min_size:continuescore = self._box_score_fast(pred, box)if score < self.det_db_box_thresh:continue# Expand using "unclipping"expanded = self._unclip(box)
3. The "Unclipping" Trick
This is the clever part. The AI tends to be conservative—it finds the center of the text but might miss the edges.
To fix this, we use a technique called "unclipping." Imagine finding the core of a word and then blowing it up slightly like a balloon. This ensures we capture the full text, including hanging tails (like 'g' or 'y') or tall accents.
def _unclip(self, box: np.ndarray) -> Optional[np.ndarray]:"""Expand the box using pyclipper."""poly = Polygon(box)if poly.area == 0 or poly.length == 0:return Nonedistance = poly.area * self.det_db_unclip_ratio / poly.lengthoffset = pyclipper.PyclipperOffset()offset.AddPath(box.astype(int).tolist(), pyclipper.JT_ROUND, pyclipper.ET_CLOSEDPOLYGON)expanded = offset.Execute(distance)if len(expanded) == 0:return Nonereturn np.array(expanded[0])
We found that expanding by about 60% (unclip_ratio=1.6) is the sweet spot.
Solving Real-World Headaches
Problem 1: Reading Like a Human
Computers don't naturally know that you read the left column before the right column. If we just sorted by position, the computer might jump across columns, creating a jumbled mess.
Our Solution: Smart Line Grouping
def _sort_boxes_reading_order(self, results: List[Tuple[np.ndarray, float]]) -> List[Tuple[np.ndarray, float]]:# ... preparation (calculate centers and heights) ...# Calculate a dynamic tolerance based on the median heightheights = [b['h'] for b in box_data]median_h = float(np.median(heights)) if heights else 20.0y_tolerance = median_h * 0.8# Group into lineslines = []current_line = []for item in box_data:if not current_line:current_line.append(item)continue# Calculate the average vertical center of the current lineavg_line_y = np.mean([b['cy'] for b in current_line])# If this box's center is close enough to the line's average centerif abs(item['cy'] - avg_line_y) < y_tolerance:current_line.append(item)else:lines.append(current_line)current_line = [item]# ... sort lines by x-coordinate ...
We taught the system to group text into "lines" first, just like a human eye scans across. It looks at the average height of the letters to determine what belongs on the same line.
Problem 2: Boxes Bumping Into Each Other
If we expand our boxes too much, they might overlap with the line below. This confuses the text recognizer, which might read the same word twice.
Our Solution: Smart Padding
def _apply_smart_padding(self, boxes: List[np.ndarray]) -> List[np.ndarray]:# ... overlap calculation (max_pad_w, max_pad_h) ...final_boxes = []for i, box in enumerate(boxes):rect = cv2.minAreaRect(box)(center, (w, h), angle) = rect# Target paddingtarget_pad_w = (w * self.padding_pct) + (h * 0.5) + self.padding_pxtarget_pad_h = (h * self.padding_y_pct) + self.padding_y_px# Clamp by neighbor limitsactual_pad_w = min(target_pad_w, max(0, max_pad_w[i]))actual_pad_h = min(target_pad_h, max(0, max_pad_h[i]))new_w = w + actual_pad_wnew_h = h + actual_pad_h# ... recreate box ...
We calculate padding dynamically:
- Horizontal: 1% of width + 50% of height + 5px
- Vertical: 5% of height + 5px
We added a "collision detection" system. Before expanding a box, it checks if there's another box nearby. It pushes the boundaries as far as safely possible without bumping into its neighbor.
Problem 3: Khmer vs. English
Khmer text is tall (with vowels above and below the line), while English is relatively compact. A system designed only for English often chops off the top or bottom of Khmer words.
Our Solution: Flexible Architecture
Instead of writing specific rules for Khmer, we trained the AI to look at the visual features of the text itself. It learns to adapt the box size dynamically based on what it sees, whether it's a short English word or a tall Khmer phrase.
Performance Characteristics
On our benchmark dataset:
- Detection Recall: 94.2%
- Precision: 96.8%
- Speed (CPU, 1920×1080): ~450ms
- Speed (GPU, 1920×1080): ~85ms
The model runs entirely in ONNX Runtime, giving us:
- Cross-platform compatibility (Windows, Linux, macOS)
- Easy deployment (no PyTorch/TensorFlow dependencies)
- Efficient inference (optimized C++ runtime)
Lessons Learned
- Preparation is Everything: We spent more time preparing the images (cleaning, resizing, fixing colors) than working on the AI model itself. Simple things like ensuring the color format is correct eliminated 80% of our initial bugs.
- Reading Order is Tricky: Don't assume top-to-bottom, left-to-right sorting works. It fails on newspapers, receipts, and forms. Grouping by lines is essential.
- Padding: A Balancing Act: Too little padding cuts off the edges of letters. Too much padding makes boxes overlap and confuse the system. Dynamic padding was our solution.
- You Need to See What's Happening: You can't fix what you can't see. We built tools to visualize every step of the process.
We added an extensive debug mode:
if self.debug:print(f" Pred shape: {pred.shape}, min: {pred.min():.4f}, max: {pred.max():.4f}")print(f" Pixels above threshold: {bitmap.sum():.0f}")
Code Walkthrough: Key Methods
Detection Pipeline
def detect_text(self, image):# 1. Load and preprocessimg = cv2.imread(image)resized, orig_size, ratios = self._resize_image(img)normalized = self._normalize(resized)# 2. Run modeloutputs = self.session.run(None, {self.input_name: normalized})probability_map = outputs[0][0, 0] # [batch, channel, h, w]# 3. Binarizebitmap = (probability_map > self.det_db_thresh)# 4. Extract boxesboxes, scores = self._boxes_from_bitmap(probability_map, bitmap, orig_width, orig_height)# 5. Apply smart paddingpadded_boxes = self._apply_smart_padding(boxes)# 6. Sort in reading orderresults = self._sort_boxes_reading_order(list(zip(padded_boxes, scores)))return results
Integration with Recognition
Detection is only half the pipeline. The boxes feed into our recognition model:
# Full OCR pipelinedetector = DBDetector('models/detection.onnx')# Detect text regionsboxes_and_scores = detector.detect_text('document.jpg')# Recognize each regionresults = []for box, confidence in boxes_and_scores:# Crop and deskew the regionregion = crop_and_rotate(image, box)# Run recognitiontext, score = recognizer.recognize(region)results.append({'box': box,'text': text,'detection_confidence': confidence,'recognition_confidence': score})
What's Next
We're continuously improving the detector:
- Adaptive thresholding based on local image statistics
- Multi-scale detection for very small or very large text
- Curved text support for documents with barrel distortion
- Table structure detection to better handle complex layouts
The code is open source at github.com/mrrtmob/kiri-ocr. Contributions welcome!
Takeaways for Implementers
If you're building your own text detection:
- Start with a proven architecture (DB, EAST, CRAFT)—don't reinvent the wheel.
- Invest heavily in preprocessing —normalization, resizing, color space handling.
- Reading order is non-trivial —line-based grouping beats simple sorting.
- Padding is essential but must be controlled —use collision avoidance.
- Test on real documents, not just benchmarks—edge cases matter.
- ONNX deployment is underrated —easier than PyTorch/TF serving.
Conclusion
Building a production-ready text detector taught us that the AI algorithm is only 30% of the solution. The other 70% is the practical engineering: preparing the images, sorting the results, and handling messy edge cases.
The DB algorithm gave us a strong foundation, but making it work reliably in the real world required solving dozens of practical problems that research papers never mention.
If you're working on OCR for under-resourced languages, I hope this helps you avoid some of the pitfalls we encountered. Feel free to reach out or open issues on GitHub—we're building this infrastructure for the entire Khmer AI community.